rasa is the "elixir", the "alchemy", the "taste" or essence of any impression; the aesthetic experience in transcendence; the emotional fulfillment of the soul; the nectar of life:))
Monday 31 December 2018
Wednesday 26 December 2018
Tuesday 11 December 2018
Wednesday 5 December 2018
Monday 3 December 2018
Thursday 29 November 2018
Tuesday 27 November 2018
Monday 26 November 2018
Atma-Shatakam / Nirvana Shatakam - The Song of the Self.
Sanskrit Version:
manobuddhyahamkāra cittāni nāham
NA ca śrotrajihve na ca ghrānanetre
na ca vioma bhūmir na tejo na vāyuh
cidānandarūpah śivo’ham śivo’ham
manobuddhyahamkāra cittāni nāham
NA ca śrotrajihve na ca ghrānanetre
na ca vioma bhūmir na tejo na vāyuh
cidānandarūpah śivo’ham śivo’ham
na ca pranasajño na vai pamcavāyuh
na vā saptadhātur na vā pamcakośah
na vākpānipādam na copasthapāyu
cidānandarūpah śivo’ham śivo’ham
na vā saptadhātur na vā pamcakośah
na vākpānipādam na copasthapāyu
cidānandarūpah śivo’ham śivo’ham
na me dveşarāgau na me lobhamohau
mado naiva me naiva mātsaryabhāvah
na dharmo na cārtho na kāmo na mokşah
cidānandarūpah śivo’ham śivo’ham
mado naiva me naiva mātsaryabhāvah
na dharmo na cārtho na kāmo na mokşah
cidānandarūpah śivo’ham śivo’ham
na punyam na pāpam na saukhyam na dukhyam
na mantro na tīrtham na vedā na yajña
aham bhojanam naiva bhojyam na bhoktā
cidānandarūpah śivo’ham śivo’ham
na mantro na tīrtham na vedā na yajña
aham bhojanam naiva bhojyam na bhoktā
cidānandarūpah śivo’ham śivo’ham
na me mṛtyuśamkā na me jātibhedah
pitā naiva me naiva mātā na janmah
na bandhur na mitram gurunaiva śişyah
cidānandarūpah śivo’ham śivo’ham
pitā naiva me naiva mātā na janmah
na bandhur na mitram gurunaiva śişyah
cidānandarūpah śivo’ham śivo’ham
aham nirvikalpo nirākāra rūpo
vibhutvāca sarvatra sarvemdriyānam
na cāsangata naiva muktir na meyah
cidānandarūpah śivo’ham śivo’ham
English Translation:
vibhutvāca sarvatra sarvemdriyānam
na cāsangata naiva muktir na meyah
cidānandarūpah śivo’ham śivo’ham
English Translation:
1)I am not mind, nor intellect, nor ego, nor the reflections of inner self. I am not the five senses. I am beyond that. I am not the ether, nor the earth, nor the fire, nor the wind (i.e. the five elements). I am indeed, That eternal knowing and bliss, Shiva, love and pure consciousness.
2) Neither can I be termed as energy (Praana), nor five types of breath (Vaayu), nor the seven material essences (dhaatu), nor the five coverings (panca-kosha). Neither am I the five instruments of elimination, procreation, motion, grasping, or speaking. I am indeed, That eternal knowing and bliss, Shiva, love and pure consciousness.
3) I have no hatred or dislike, nor affiliation or liking, nor greed, nor delusion, nor pride or haughtiness, nor feelings of envy or jealousy. I have no duty (dharma), nor any money, nor any desire (refer: kama), nor even liberation (refer: moksha). I am indeed, That eternal knowing and bliss, Shiva, love and pure consciousness.
4) I have neither virtue (punya), nor vice (paapa). I do not commit sins or good deeds, nor have happiness or sorrow, pain or pleasure. I do not need mantras, holy places, scriptures, rituals or sacrifices (yajna). I am none of the triad of the observer or one who experiences, the process of observing or experiencing, or any object being observed or experienced. I am indeed, That eternal knowing and bliss, Shiva, love and pure consciousness.
5) I do not have fear of death, as I do not have death. I have no separation from my true self, no doubt about my existence, nor have I discrimination on the basis of birth. I have no father or mother, nor did I have a birth. I am not the relative, nor the friend, nor the guru, nor the disciple. I am indeed, That eternal knowing and bliss, Shiva, love and pure consciousness.
6) I am all pervasive. I am without any attributes, and without any form. I have neither attachment to the world, nor to liberation. I have no wishes for anything because I am everything, everywhere, every time, always in equilibrium. I am indeed, That eternal knowing and bliss, Shiva, love and pure consciousness.
I would add to this beautiful and ancient hymn a verse that speaks to all of us working today to make the world a more peaceful place. To those serving others and those who we serve:
I am not homelessness, I am not trauma, nor am I addiction.
I am not depression, nor anxiety, nor sleeplessness.
I am not sadness, nor fear, nor am I frustration. I am not invisible.
I am, indeed, that eternal knowing and bliss, Shiva, love and pure consciousness.
I am not depression, nor anxiety, nor sleeplessness.
I am not sadness, nor fear, nor am I frustration. I am not invisible.
I am, indeed, that eternal knowing and bliss, Shiva, love and pure consciousness.
Tuesday 6 November 2018
Tuesday 23 October 2018
Thursday 11 October 2018
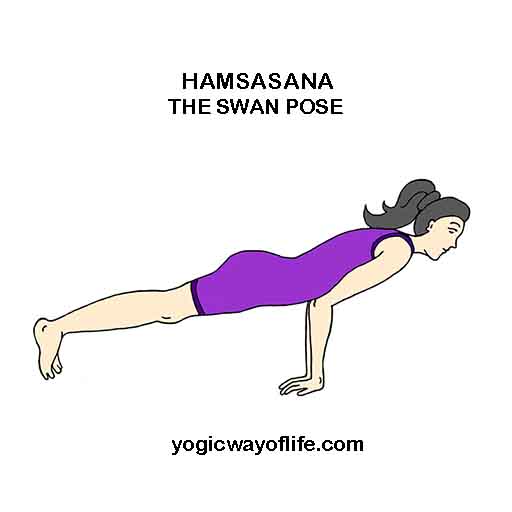
Hamsasana – The Swan Pose.
Hamsasana or “Swan Pose” is a yoga asana which resembles a swan when performed. Benefits of Hamsasana range from improved digestion to strengthening of the arms and abdominal muscles. In Sanskrit, ‘Hamsa’ means the swan and hence the name Hamsasana.
How to do Hamsasana (The Swan Pose)
- Hamsasana should be performed on an empty stomach. Make sure there is a gap of 4 to 5 hours after a heavy meal.
- Assume the kneeling position with the legs slightly apart.
- Keep both the hands between the knees on the ground. The hands should point back towards the legs.
- Rest your elbows on your abdomen. Let your abdominal muscles assume the weight of the upper body. The elbows should be kept together.
- Take the legs backward in a full stretch, one at a time.
- Make the body straight like a plank and use the toes to balance the weight of your legs. Keep the legs together.
- The body should be straight and make sure that your knees are not bent.
- In the final position, the entire weight of the body is supported by the toes and the palms on the ground.
- Head and neck should be kept straight to be in line with the body.
- In the beginning, you may try this position for 10 – 30 seconds. Once you are comfortable, you may increase it as per your capacity.
- Keep your awareness on the abdomen and breathe normally.
Benefits of Hamsasana (The Swan Pose)
- In Hamsasana, the weight of the upper body rests on the abdomen. This strengthens the abdominal muscles and helps to reduce the belly.
- It gives strength to the arms.
- The pressure on the belly massages all the organs in the abdomen.
- It improves digestion and clears constipation.
Hamsasana is very similar to Mayurasana or the Peacock pose. In fact, Hamsasana can be used as a preparatory pose for learning Mayurasana. Try to master Hamsasana first. Once you are able to maintain the position for at least 1 minute, then you can attempt Mayurasana. Take your own time. Make sure you are not straining the arms too much. Discontinue if there is any pain in the arms and shoulders. This asana puts a lot of weight on the arms and toes. Those with recent problems like fractures, sprains and ligament tears in arms or legs should not attempt this asana. Also, those who are obese should be extra careful as the entire weight will rest on the belly, arms, and toes. Hamsasana will certainly help to reduce the belly, but it has to be taken up slowly. Start with a few seconds and then increase the duration to a minute or more, according to your comfort and ability.
Once you have mastered Hamsasana, Mayurasana won’t be difficult. The only difference is that in Mayurasana, one has to lift both the legs above the ground. The body and the legs are made parallel to the ground and the full body weight rests on the arms and abdomen alone. This is difficult in the beginning. Start with few seconds and later increase it according to your capacity. The benefits of Mayurasana are similar to that of Hamsasana.
Tuesday 9 October 2018
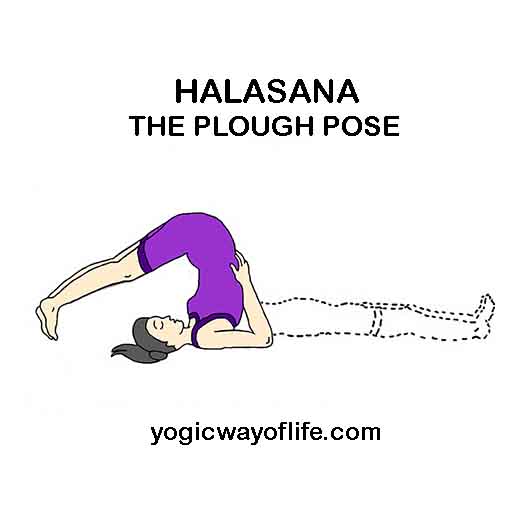
Halasana – The Plough Pose.
Halasana or plough pose can be practiced after one master the poorva halasana or the preliminary plough pose. Halasana can remove fat from the waist and improve the health of the abdominal organs especially the kidneys, pancreas and the intestines. It can also improve the functioning of the thyroid. In Sanskrit ‘Hal’ means a ‘plough’ and ‘Asana’ means ‘pose’. In Halasana, the body resembles the plough in the final pose.
Halasana should be done with care and should be avoided by those suffering from sciatica, slipped disk, spondylitis, high blood pressure.
How to do Halasana (The Plough Pose)?
- Start in the supine position, lying on your back.
- Relax fully and breathe normally. Keep the legs together and the hands should be kept close to the body.
- Hold your breath and slowly raise the legs to a vertical position. Use only the muscles of the waist and stomach to do this. Do not use the arms to lift the legs.
- Move the legs further back as much as possible. At this stage, one can use the hands to support the lower back and to further push the waist and trunk, until the legs touch the floor.
- Move the legs as further from the head as possible. At this stage, one achieves a chin lock. Pressure is put on the thyroid glands.
- Maintain this position for few seconds to few minutes depending on your level of comfort.
- Come back to the normal supine position. Relax all the muscles and breathe normally.
- After this asana, one can do any backward bending asana (like ushtrasana, supta vajrasana, chakrasana, etc.) as a counter pose.
Benefits of Halasana
- It helps to reduce fat around the waist.
- It stretches the abdominal organs especially the intestines, the kidneys, and the pancreas and improves the health of those organs. This is good for diabetic patients.
- The chin lock puts pressure on the thyroid glands and helps to balance metabolic rate.
- Halasana can improve digestion, relieve piles and constipation.
Saturday 6 October 2018
Wednesday 3 October 2018
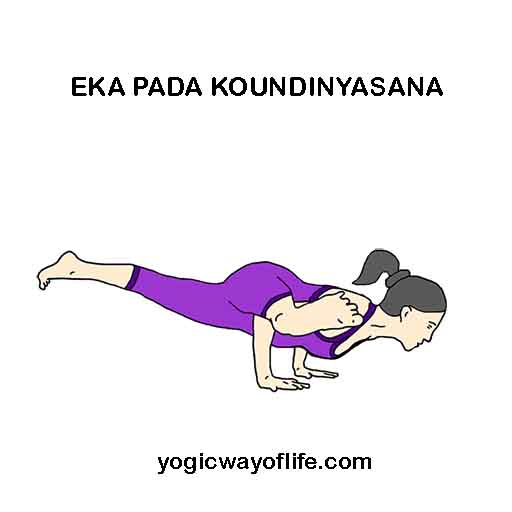
Eka Pada Koundinyasana.
Eka Pada Koundinyasana or the one-legged pose of Sage Koundinya strengthens the arms, neck, and wrists. In Sanskrit, Eka means one, Pada means leg and Asana is a pose. This pose is an arm balance posture named after Sage Koundinya.
How to do Eka Pada Koundinyasana?
- Start with the standing position or Tadasana. Then come into a squat with thighs pressing together, sitting on the toes of the feet.
- Twist towards the left and place both the hands on the floor. The right hand will be touching the left leg above the knees.
- Lean forward towards the left and try to lift yourself off the floor by using both the hands. This is same as the twisted Bakasana. From this position, we can move on to the Eka Pada Koundinyasana.
- Take the left leg backward and at the same time move the right leg forward and let it rest on top of the right-hand elbow. (Now, doing this may be difficult. Hence, one can try first keeping the left leg straight pointing out and the right leg backward, straight in line with the body. From here, in a single step flip the left leg back and the right leg forward.)
- This is the final pose. The right leg is pointing outwards towards the right and the left leg is straight in line with the body. The left hand and elbow are free, just balancing the weight of the body.
- Remain in the final position for as long as you are comfortable. In the final pose, one can hold the breath or can take very slow shallow breaths.
- To release the pose, lower the left leg and let it touch the floor. At the same time, the right leg can be bent and lowered to touch the floor. From here come back to the squat position.
- This can be repeated on the other side also.
Benefits of Eka Pada Koundinyasana
- Eka Pada Koundinyasana strengthens the arms, wrists, and shoulders.
- It improves the sense of balance.
- The spinal twist strengthens the spine.
- The abdominal organs are massaged and toned.
- It rejuvenates the digestive organs.
Eka Pada Koundinyasana is an advanced posture and should not be attempted by beginners. One requires the good strength of the arms and wrists and a great sense of balance to achieve it. Those suffering from any injury of arms, wrist or shoulders should avoid this asana.
Wednesday 26 September 2018
Tuesday 25 September 2018
Thursday 13 September 2018
Tuesday 11 September 2018
Thursday 6 September 2018
Eka Pada Adho Mukha Svanasana – One Legged Downward Facing Dog Pose.
Eka Pada Adho Mukha Svanasana or the downward facing dog pose stretches and straightens the spine, strengthens the leg muscles, flexes the hamstrings and thigh muscles and improves balance. In Sanskrit, Eka means one, Pada means leg, Adho means down, Mukha means face and Svana means a dog. Eka Pada Adho Mukha Svanasana is an intermediate level pose that can be attempted by most practitioners.
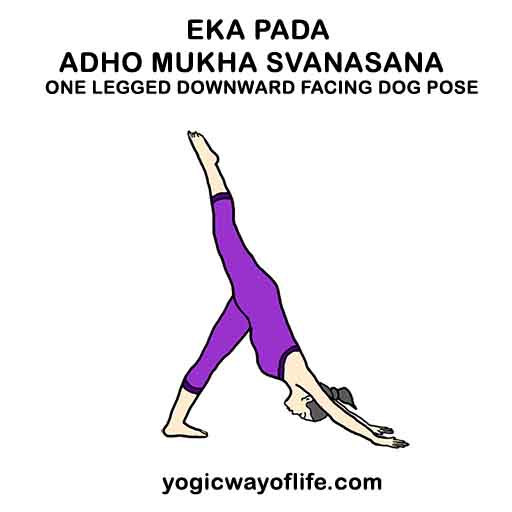
How to do Eka Pada Adho Mukha Svanasana
- Start with the simple Adho Mukha Svanasana For this, start in kneeling position and place your palms on the floor in front of you. Keep the palms spread out on the mat. The knees should be preferably behind the tailbone to get a good stretch in the final downward facing dog pose. Slowly raise your knees and straighten it out. At this point the legs are straight and the weight of the body is supported by the two palms and the feet. Stretch your heels and the thigh muscles while straightening the legs. Tuck your belly in and push the chest slightly towards the floor while straightening the spine. Place your head between the inner-side of the upper arms and look down towards the floor. This is the simple Adho Mukha Svanasanapose. Breathe normally in this position.
- From here we proceed to the Eka Pada Adho Mukha Svanasanawhich involves raising one leg upwards.
- Raise your right leg upwards in the air. Try to align the right leg with the spine. This is the final position. Remain in this position for up to a minute or according to your convenience.
- To release the pose, bring down the right leg to the floor and come back to the simple downward facing dog pose.
- Repeat the same with the left leg raised in the air.
Benefits of Eka Pada Adho Mukha Svanasana
- Eka Pada Adho Mukha Svanasana is an inverted pose. It reverses the flow of blood to the head and upper chest region, nourishing the brain with ample blood supply thereby relieving headaches and migraine. This pose can improve cognition and other brain functions.
- It gives a good stretch to the spine, the quadriceps and the leg muscles.
- This asana relieves pain in upper and lower back.
- It helps to loosen the hamstring muscles and the hip flexor muscles for more flexibility.
- Eka Pada Adho Mukha Svanasana strengthens the arms and the shoulders.
- It creates a sense of relaxation and well-being and boosts confidence.
- Eka Pada Adho Mukha Svanasana is a good balancing pose. Staying in this pose for a minute can improve the sense of body balance.
Contraindications of Eka Pada Adho Mukha Svanasana
- Being an inverted asana, Eka Pada Adho Mukha Svanasana should not be done by those suffering from high blood pressure.
- Do this pose with caution if you suffer from vertigo.
Tuesday 4 September 2018
Eka Padasana – One Foot Pose.
Eka Padasana or One Foot Pose is a balancing asana. Eka Padasana is useful to improve neuro-muscular coordination of the body. Eka Padasana is a balancing pose and gives a sense of control of bodily movements to the practitioner.
The benefits of Eka Padasana can be understood by knowing how our muscular coordination works, to maintain the sense of balance. Our sense of body balance is controlled by the cerebellum. When we grow up, as a child, we first learn how to walk on two feet. It is a great balancing act by itself, which we learn with a lot of trial and error. Yet, when we grow up, we take it for granted. Even though it looks like a simple act, it involves tremendous neural activity and neuro-muscular coordination to achieve it. This neuro-muscular coordination can become weaker either with age or with specific neurological conditions.
Yoga has many balancing asanas or poses which help to improve the neuro-muscular coordination. Each of the balancing asanas has their own specific benefits. Eka Padasana can improve the sense of balance and strengthen the muscles of the legs and lower back.
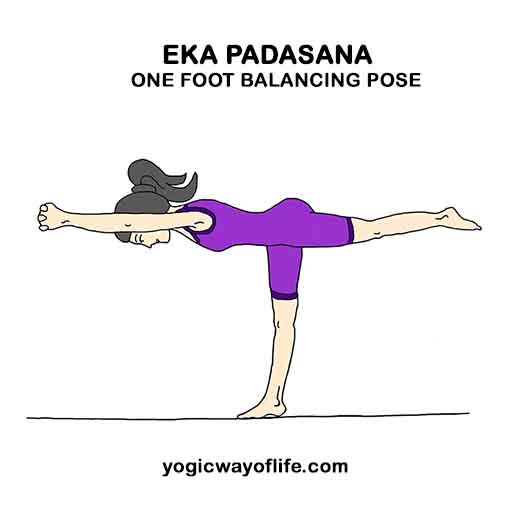
How to do Eka Padasana (One Foot Pose)?
- Stand straight and raise your hands above the head. Inhale while raising your hand, expanding the chest.
- Interlock the fingers and hold the hands together.
- Bend forward slowly with arms stretched out in front of you. Exhale while bending forward.
- Simultaneously, raise the left leg and take it backward.
- Keep bending forward until your body is parallel to the ground. At the same time, take your left leg back so that it is perpendicular to the right leg.
- The entire body weight is supported on the left foot alone.
- In the final pose, the hands, body, trunk, and legs are in a straight line, parallel to the ground. The whole body is perpendicular or at 90 degrees to the right leg looks like a “T”.
- Maintain this position as per your comfort level. During the final position, you can breathe normally. Concentrate on the sense of balance and try to maintain this position for as long as you can.
- Repeat the same with the other leg, in which case the entire body weight is supported by the left foot alone.
Benefits of Eka Padasana (One Foot Pose)
- Eka Padasana helps to strengthen the leg muscles.
- It can give a good stretch to the muscles of the lower back.
- Eka Padasana improves the sense of balance and develops nervous coordination.
Thursday 23 August 2018
Monday 20 August 2018
Friday 27 July 2018
Wednesday 25 July 2018
Wednesday 18 July 2018
Tuesday 17 July 2018
Dolphin Plank Pose.
Dolphin Plank Pose is a yoga asana for increasing core strength and developing balance. The muscles of the arms, shoulders, abdomen, and legs are all strengthened. The Dolphin Plank Pose is a combination of the plain Dolphin Pose and the Plank Pose.
How to do Dolphin Plank Pose?
- The Dolphin plank pose can be approached from various starting poses. The easiest would be to start in the kneeling position.
- From the kneeling down pose, bend over and place the forearms on the ground in front of you.
- Slide the knees slightly back, straighten your back and raise the buttocks up.
- Slide the leg back further, till the body is in a straight line. Keep the legs off the floor, except for the toes.
- Use the toes to support the partial weight of the body.
- Remain in this position for as long as you are comfortable. Breathe normally in this position. The body weight is entirely supported by the toes and the forearms.
- To release the pose, bring down the legs and let the knees touch the floor. Slide your legs further up and then raise yourself up to the sitting position.
- Lie down in any relaxation pose like Shavasana for few minutes. In the dolphin pose, all the muscles are stretched. This stretch followed by relaxation, in the end, can help to release stress in the body as well as the mind.
Benefits of Dolphin Plank Pose
- Dolphin Plank Pose strengthens the arms and the shoulders.
- It tones the muscles of the abdomen.
- Dolphin plank pose improves the sense of balance.
- It increases the strength of core muscles in the chest, abdomen, arms, and legs.
Contraindications for Dolphin Plank Pose
- Dolphin plank pose should be avoided by those suffering from the injury to arms, shoulders, neck, and hips.
- Those who have undergone any recent surgery of the chest, abdomen, arms, hips shoulders and legs should not do this asana.
Thursday 12 July 2018
Dhanurasana – The Bow Pose
Dhanurasana or the Yogic Bow Pose is so called as it resembles a bow when it is performed (“Dhanur” means Bow in Sanskrit). In Dhanurasana, body and the legs take the shape of the bow, while the hands look like the string.
How to do Dhanurasana (The Bow Pose)?
- Lie down flat on your stomach with your hands on the side. Relax and breathe normally.
- Slowly bend your knees back as far as possible, almost touching the back of your buttocks.
- Now arch your head and neck upwards and backward. Slowly move the hands towards the lower leg. Use both your hands and try to get hold of your lower leg at the ankles. Hold on to the ankles till you complete the asana.
- Now inhale deeply and expand your chest. At the same time, pull the legs upwards using your hands. Arch your trunk backward and upwards along with your head and neck. When fully stretched, your shape will resemble a bow. Your thighs will be raised above the ground and you will be resting on the abdomen and the lower part of the chest alone.
- Continue in this position as much as you are comfortable, starting from a few seconds up to 30 seconds.
- Release the pose by letting go of the lower legs and bringing the legs, trunk, and head to the original supine position. Exhale during this process of releasing the pose.
- Dhanurasana gives a very good backbend. It is good to follow it up with a counter pose to stretch the body in the opposite direction. The child’s pose can be a good counter pose for Dhanurasana. To perform the child’s pose, Kneel on the floor and bend forward, putting your head between the knees and the forehead touching the floor. Take your hands behind your buttocks and hold your right wrist with your left hand. Adjust your position to relax all your body parts. Breathe slowly and deeply in this position. Stay as much as you are comfortable.
- Slowly release the child’s pose and rest in savasana.
Benefits of Dhanurasana (The Bow Pose)
- Dhanurasana improves the strength of the back and the lower abdominal muscles.
- It gives a good stretch to the shoulders, hands, thorax, thighs and the legs.
- Dhanurasana massages the abdomen and internal organs.
- It improves digestion.
- It massages the pancreas and is good for diabetic patients.
- Dhanurasana expands the chest and corrects stooping of the back and shoulders.
Thursday 5 July 2018
Dandasana – The Staff Pose
Dandasana or the Staff Pose is a simple sitting pose which forms the starting position for most other sitting yogic postures. In Sanskrit, Danda means a stick or staff and Asana means a pose.
How to do Dandasana (The Staff Pose)?
- Sit on the floor and stretch your legs in front of you.
- Place the hands on the sides on the floor.
- Bring the two legs together with both the feet touching each other.
- Put slight pressure on the floor with your palms and raise your spine up. The back and the head should be held straight and gaze forward.
- Flex the feet back so feel a slight tug under the legs muscles.
- Broaden the chest so that the two shoulder blades are pulled towards each other in the back. If you have a weak back, you may use the support of the wall to do this pose.
- Push the thighs to the floor and make sure the legs are straight. If your hamstrings are tight, then you may use a blanket under your legs.
- Breathe normally and maintain this position for as long as you wish.
Benefits of Dandasana (The Staff Pose)
- Dandasana is a starting pose for most of the other sitting postures. For example, if you want to perform Paschimottanasana or the forward bend pose, you have to start with this asana.
- It helps to strengthen the muscles of the back and corrects minor postural defects.
- Perfecting this asana gives you the strength and steadiness to do more advanced yogic poses.
- The muscles of the chest and abdomen are stretched and strengthened.
- Maintaining the pose for longer durations can remove stiffness of the lower back muscles.
- It can improve digestion.
- It can remove fatigue in the leg muscles.
- It increases the flexibility of the lower back and hips.
Contraindications for Dandasana (The Staff Pose)
- Dandasana is a beginner’s pose. It does not have any known contraindications for a normal healthy person. However, those who suffer from the weak back should try to do this with the support of the wall.
- Use a blanket under the legs if your hamstrings are too tight.
Tuesday 3 July 2018
Chaturanga Dandasana – The Four-Limbed Staff Pose
Chaturanga Dandasana or Four-Limbed Staff Pose is a basic pose to bring balance and strength to arms and legs. In Sanskrit, Chatur means four and Anga means part (of the body). Danda means the staff and asana mean the pose. It is also known as the Low Plank Pose. In the final pose, the entire weight of the body is distributed on the palms and the toes.
How to do Chaturanga Dandasana (Four-Limbed Staff Pose)?
- Start with Vajrasana or the kneeling position.
- Now, raise the buttocks up and bend forward, placing your palms on the floor in front of you.
- The palms should be spaced at shoulder length and the hands should be straight. The knees and lower legs are rested on the floor.
- Now, take your legs back with the legs supported on the toes.
- This is the high plank pose where the knees are above the ground and you are supported by the palms and the toes.
- From the high plank pose lower the knees to the ground and bend the elbows bringing the torso closer to the floor. At this point the two hands are on the sides, elbows bend and the chest above the ground.
- Raise your knees above the floor, so that the body is in a straight line, horizontal to the ground. The entire weight of the body is resting on the palms and the toes.
- This is the final pose. Try to remain in this position for as long as you are comfortable.
- To release the position, make the hands straight and lower the knees to the ground to come to the high plank pose.
- Then bend the knees and bring back the buttocks to the kneeling position.
Benefits of Chaturanga Dandasana (Four-Limbed Staff Pose)
- Chaturanga Dandasana strengthens the wrists, arms, muscles of the legs, hips, and shoulders.
- It is a good balancing pose for beginners.
- It strengthens the muscles around the spine.
- This pose is used in Surya Namaskar or the sun salutation. It is achieved before doing the Ashtanga Namaskara pose in the Sun Salutation.
- It strengthens the toes as substantial part of the body weight is supported by the toes.
To avoid the common mistakes in this pose, make sure that your chest does not sag down or touch the ground. The entire body should be straight like a plank and parallel to the ground.
Thursday 28 June 2018
Chakrasana – The Wheel Pose.
Chakrasana or the wheel pose is a backward bending yoga asana. Chakra in Sanskrit means Wheel and Asana means a pose. In Chakrasana, the final position looks like a wheel, hence the name. This posture gives great flexibility to the spine.
How to do Chakrasana (Wheel Pose)?
- Lie down on your back with hands on the side.
- Bend your knees and bring your heels as close to the buttocks as possible. The heels should be about 1 foot apart.
- Now raise your hands and bring it back next to the ears. Place the palms on the floor with the fingers pointing towards the shoulders.
- Lift your body up with the support of the palms and the feet.
- Rotate the head slightly, so that your gaze is towards the floor.
- Stretch your thighs and shoulders. In the final position, your body looks like an arch, almost like a wheel.
- Maintain this position, according to your capacity.
- To release the position, lower your body until it touches the ground. Straighten your legs. Hands can go back to the original position to the sides.
- It should be followed by forward bending poses to counteract the pressure created by the back bend.
Benefits of Chakrasana (Wheel Pose)
- Chakrasana strengthens the back and abdominal muscles.
- It tones the organs in the abdomen including the digestive, excretory and reproductive organs.
- It strengthens arms, shoulders, wrists, abdomen, and spine.
- It expands the chest and lungs.
- It stimulates the thyroid gland.
- Chakrasana is excellent for those suffering from back pain.
- It tones the liver, pancreas, and kidneys.
Contraindication for Chakrasana (Wheel Pose)
- Chakrasana should be avoided by those suffering from cardiac ailments.
- Those who suffer from high blood pressure should also avoid this pose.
- If you are suffering from vertigo you may do this pose with caution under supervision.
- Those who have undergone recent surgeries should not attempt this pose.
Tuesday 26 June 2018
Thursday 21 June 2018
Brahmacharyasana – The Celibate’s Pose.
Brahmacharyasana or the Celibate’s Pose helps to conserve sexual energy and strengthens abdominal muscles. It comes from the Sanskrit word Brahmacharya which means control over the senses especially the sexual urge.
Yoga believes that the sexual energy in both man and women is very potent and can be used for evolution and reach higher states of consciousness. Yoga also believes that this sexual energy can be transmuted into the higher form of energy called Ojas, which improves the vitality of the entire physical and mental body. Brahmacharyasana is one of the poses that aid in this transmutation.
How to do Brahmacharyasana (the Celibate’s Pose)?
- Sit on the floor with legs stretched out in front of you.
- Keep the hands on the sides with palms touching the floor. The palms should face forwards. Keep the hand and elbow straight.
- Tense the entire body to make the legs, abdomen and chest stiff.
- Now raise yourself up with the aid of the palms alone. This needs some strength in the initial stages. With practice, one will be able to lift oneself up entirely by using the palms. The weight is borne entirely by the hands and shoulders.
- The entire body is balanced on the hands. This is the final position.
- Remain in this position for as long as it is comfortable. Retain your breath in the final position.
- Return to your base position on the ground. Exhale after touching the ground. Take few normal breaths before repeating the process. Practice up to 3 times in each session.
- After this asana, take rest in Shavasana or the Corpse Pose.
Benefits of Brahmacharyasana (The Celibate’s Pose)
- This asana strengthens the arms and shoulders.
- Brahmacharyasana helps to tone and strengthen the abdominal muscles.
- This asana is excellent for those who wish to conserve sexual energy. Brahmacharyasana helps to sublimate the sexual energy to the subtler form of energy called Ojas, which improves the physical and mental health of the body.
Wednesday 20 June 2018
Tuesday 19 June 2018
Saturday 16 June 2018
Bhujangasana – The Cobra Pose.
Bhujangasana or the Cobra Pose is one of the main backward bending asanas used in yoga. In Bhujangasana, the head and trunk resemble a cobra with the raised hood, hence the name (Bhujanga means Cobra in Sanskrit). Bhujangasana is easy to perform and is integrated into other yoga practices like the Surya Namaskar, where it appears as the 8th pose in the series of 12 poses.
Usually, our back muscles don’t get much exercise, in our day to day activities. The weakening of these muscles can lead to backaches, stooping, slipped disks and other posture defects. Bhujangasana is an easy way to strengthen the back muscles. You should avoid this asana if you are pregnant or if you have had any abdominal surgery in the recent past.
How to do Bhujangasana (The Cobra Pose)?
- Lie down on your stomach with hands on the side, toes touching together.
- Bring your hands to the front at the shoulder level, with palms resting on the floor.
- Slowly raise your trunk and head with the support of the palms alone. The arms should be bent at the elbows.
- Arch your neck slightly backward, so that the pose looks like a cobra with the raised hood.
- Breathe normally and feel the stomach press against the floor.
- Hold the asanas for few seconds in the beginning stages. One may go up to 2 minutes as one progresses.
- You can release the pose by bringing the hands back to the sides and resting your head on the forehead. Then, place the hands under your head like a pillow. Bend and rest your head on one side and breathe normally.
Benefits of Bhujangasana (The Cobra Pose)
- Bhujangasana strengthens the back muscles especially the lower back.
- It increases the flexibility of the spine and the muscles around it.
- It tones the organs in the lower abdomen, the digestive organs, the urinary and reproductive organs.
- It tones the buttock muscles.
- Bhujangasana can correct some of the menstrual irregularities.
Contraindications for Bhujangasana (The Cobra Pose)
- Bhujangasana should be avoided if you have any spine or hip injury.
- Those who have severe pain in the lower back can do the simpler version of Bhujangasana, namely the Sphinx Pose.
Subscribe to:
Posts (Atom)


