Monday 29 January 2018

Pavanamuktasana / Wind-Relieving Pose.

Pawanmuktasana

How to do Pavanmuktasana?


  1. Start with your hands and legs straight on the floor.
  2. Inhale and fold your both legs.
  3. Now bring it towards your chest pulling from your hand.
  4. Then breathe out and lift your head and touch your nose to the knee.
  5. Hold the position as per your comfort.

Benefits of Pavanmuktasana

  1. Helps in faster weight loss.
  2. Helps in strengthening abdomen muscles.
  3. Improves flexibility of lower back.
  4. Relieves Constipation.
  5. Very effective for gas problem.

Repetitions for doing Pavanmuktasana

(7 – 15 times on a daily basis)

Precautions:

  1. Do not practice any Asana OR Pranayama in which you don’t feel comfortable.
  2. Do not overdo the exercises if you feel pain in your body.
  3. Start exercises mildly and then increase the repetitions as per your capacity.
  4. People suffering from Back pain, Slip disc OR chronic disease should only practice Yoga and other exercises under the expert supervision otherwise do not do it.
  5. Pregnant women should only practice Yoga and other exercises only under the supervision of an expert otherwise do not practice any exercise by watching videos or website material.
  6. People with Slip disc should avoid all forward bending exercises while sitting OR Standing.

Hatha Yoga.


Thursday 25 January 2018

Using the TFL to Refine Utthita Parsvakonasana.

Using the TFL to Refine Utthita Parsvakonasana

Many of the standing poses have a lunge component; that is, the forward hip and knee flex while the back hip and knee extend. It is not unusual for these types of asanas for the forward knee to drift inward, with the pelvis moving in the opposite direction. An example of this is Utthita Parsvakonasana (Extended Lateral Angle Pose).

Positioning the knee over the ankle aligns the leg bones, especially the femur and tibia. This brings the anatomic and mechanical axes closer together so that support in the pose is derived more from the strength of the bones than from muscular effort. Additionally, allowing the knee to drift inward can place stress on the lateral compartment of the joint. Adjusting the position of the femur and the tibia aids to distribute the joint reaction forces over a greater surface area.

tensor fascia lata
Click for larger image.
Here’s the Anatomy . . . 


The tensor fascia lata (TFL) originates from the front part of the outer surface of the iliac crest and the anterior superior iliac spine. It inserts onto the fascia lata (iliotibial band). The fascia lata continues down the thigh to insert onto the front outside of the upper tibia at Gerdy’s tubercle. The TFL abducts, flexes, and internally rotates the hip joint. It can also synergize the quadriceps to extend the knee when it is flexing less than 30 degrees. If the knee is flexing greater than 30 degrees, then the NFL can act as a knee flexor.

tensor fascia lata and triceps

gluteus maximus and TFL on the back leg
Here’s the Cue

In my personal practice, I achieve this alignment by engaging the tensor fascia lata on the bent leg. To activate this muscle I straighten the elbow and then gently press the outside of the knee against the arm, as shown. This abducts the thigh at the hip joint. Because the arm keeps the knee from moving backward, the abduction component of the TFL has the biomechanical effect of drawing the pelvis forward. This helps to open the front of the body in the asana. Additionally, activating the tensor fascia lata synergizes the psoas in flexing the hip and tilting the pelvis. Tilting the pelvis forward in this manner laterally flexes the trunk and helps to turn the torso efficiently into the pose. The gluteus minimus, gluteus medius, and gluteus maximus muscles all contribute to these actions.

I follow-up contracting the TFL with gently engaging the back-leg gluteus maximus to extend and externally rotate the hip. These combined movements aid to stabilize the pelvis and lengthen the adductor muscles.

antagonists of the pose stretching

Wednesday 24 January 2018

Antagonist/Synergist Combinations in Yoga.

Antagonist/Synergist Combinations in Yoga

In this post, we explore the relationship between the tensor fascia lata (TFL) and the gluteus maximus. In addition, I add a cue for engaging the adductor Magnus as a synergist of the gluteus maximus. Knowledge of these relationships can be used to refine and stabilize postures with a lunge component, such as Warrior II.

The "Deltoid" of the Hip . . .

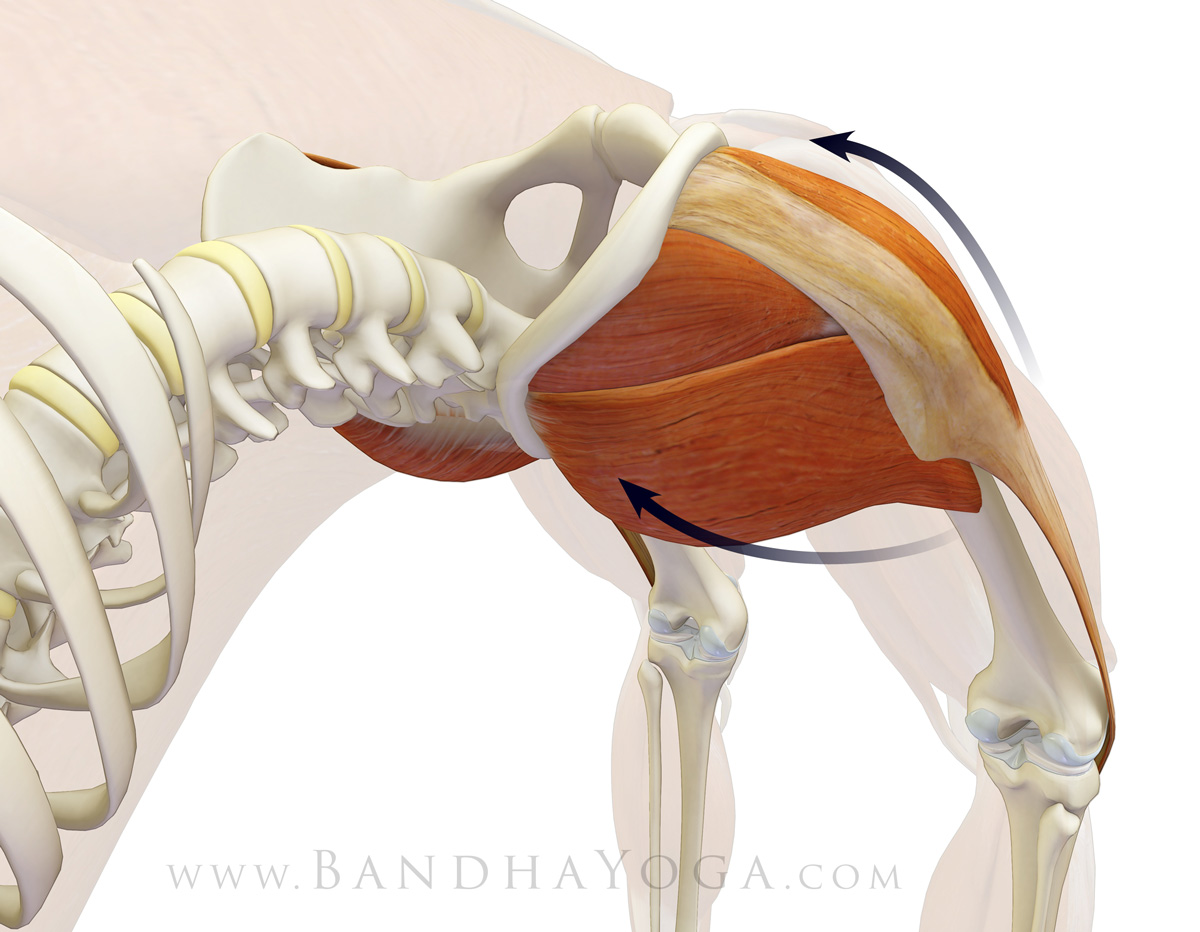
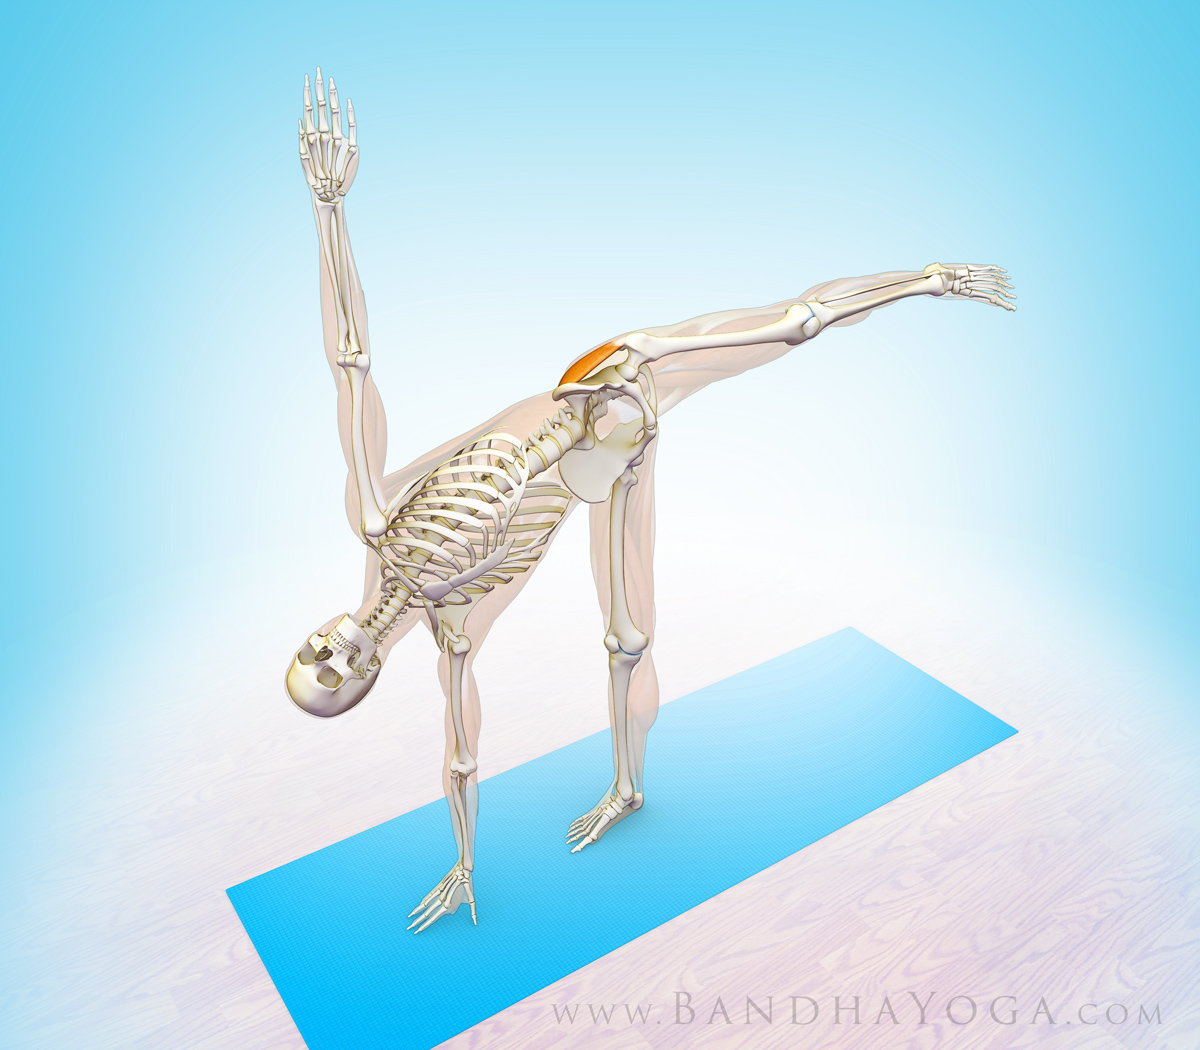
You might think of the TFL as akin to the anterior deltoid of the shoulder in that it flexes and internally rotates the joint. The gluteus maximus is similar to the posterior deltoid in that it extends and externally rotates the articulation. Both muscles can abduct the hip. They are thus antagonists for flexion/extension and rotation and synergists for abduction.

gluteals and tensor fascia lata - "the deltoid of the hip"
The deltoid of the shoulder and the "deltoid" of the hip.
Click image for larger view.


The gluteus medius and minimus lie between the TFL and the gluteus maximus and are comparable to the central portion of the deltoid. They are abductors and, depending on the position of the hip joint, synergists of the TFL or gluteus maximus. For example, if the hip is flexing and internally rotating, the gluteus medius and minimus synergize the TFL for these actions. If the hip is extending and externally rotating, they synergize the gluteus maximus. For this reason, the combination of the tensor fascia lata and gluteals is sometimes referred to as the “deltoid” of the hip.

The front hip in Warrior II flexes, abducts, and externally rotates. This combination of movements is known as “circumduction” and it involves the contributions of several muscles. The tensor fascia lata and gluteals produce the abduction component. Depending on the position of the joint, each of these muscles has several possible actions which can synergize or oppose one of the other muscle’s actions. Throughout the range of motion of the hip, the TFL and gluteus maximus form an antagonist/synergist pair.

Here’s the Cue . . . 

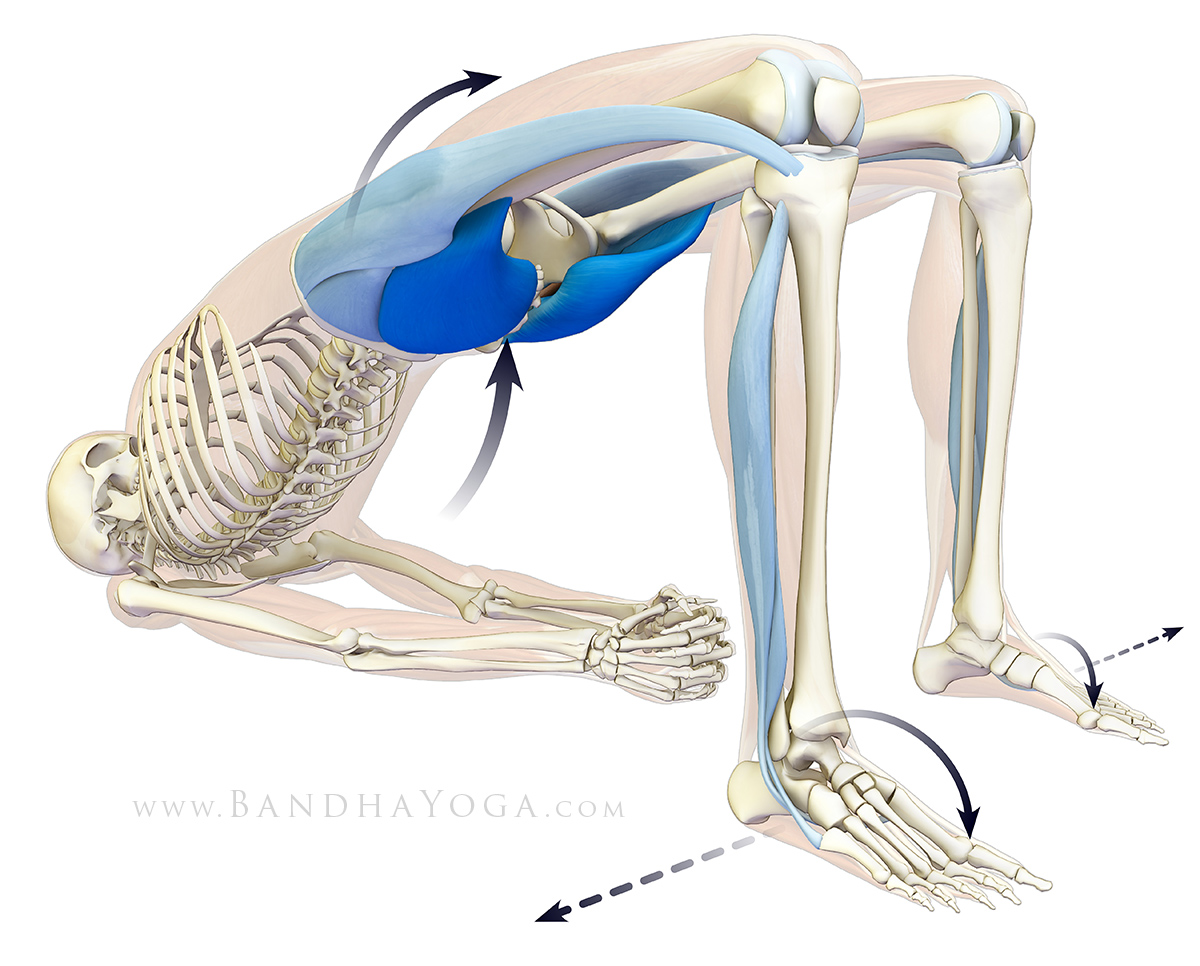
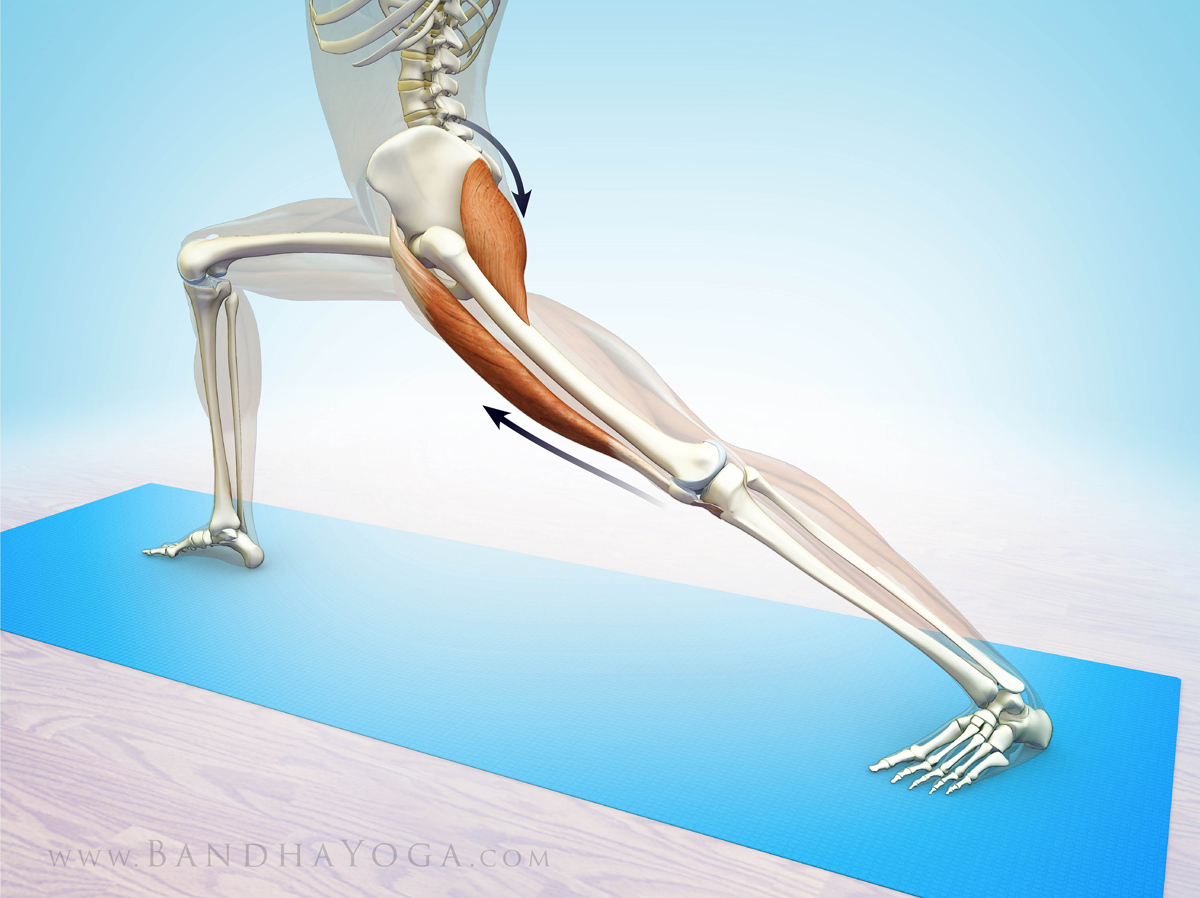
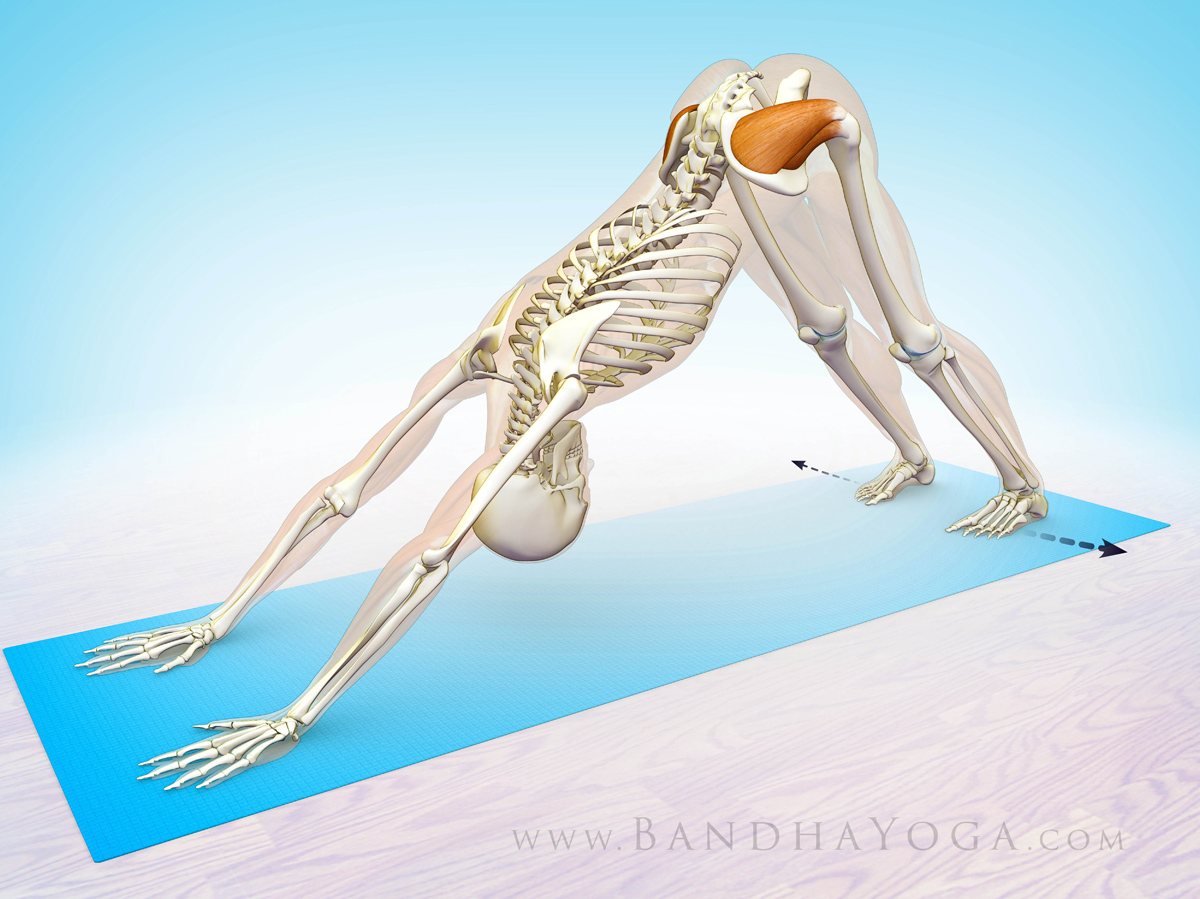
In Warriors I and II, I bring the front knee in line with the hip and ankle and then gently press the sole of the foot into the mat. This activates the TFL and gluteus maximus, respectively (the quadriceps also engage). Press the back foot into the mat to stabilize it and then gently attempt to drag it away from the front foot. This acts to extend and abduct the hip and stabilize the pelvis. I balance these cues for the front and back legs and ease back on the muscular force as I attain stillness in the pose.

gluteus maximus and tensor fascia lata in warrior II
Engaging the gluteus maximus and tensor fascia lata in Warrior II.
Click image for larger view.

Adding the Adductor Magnus…

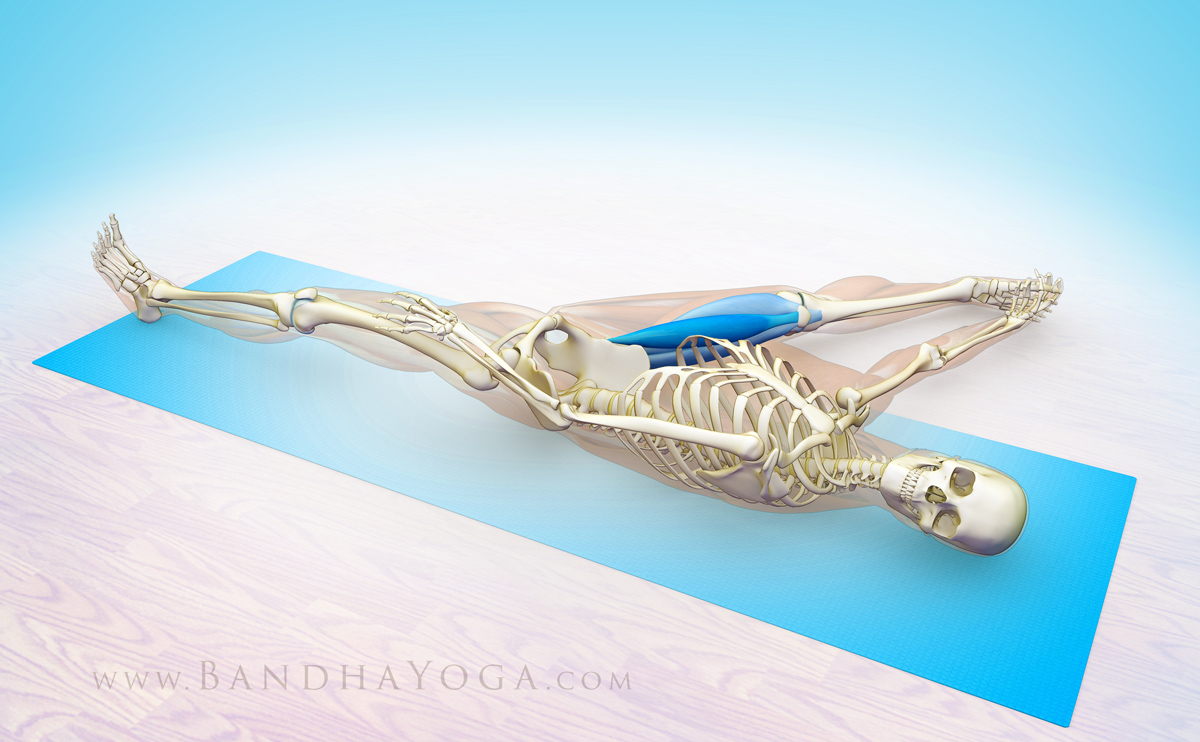
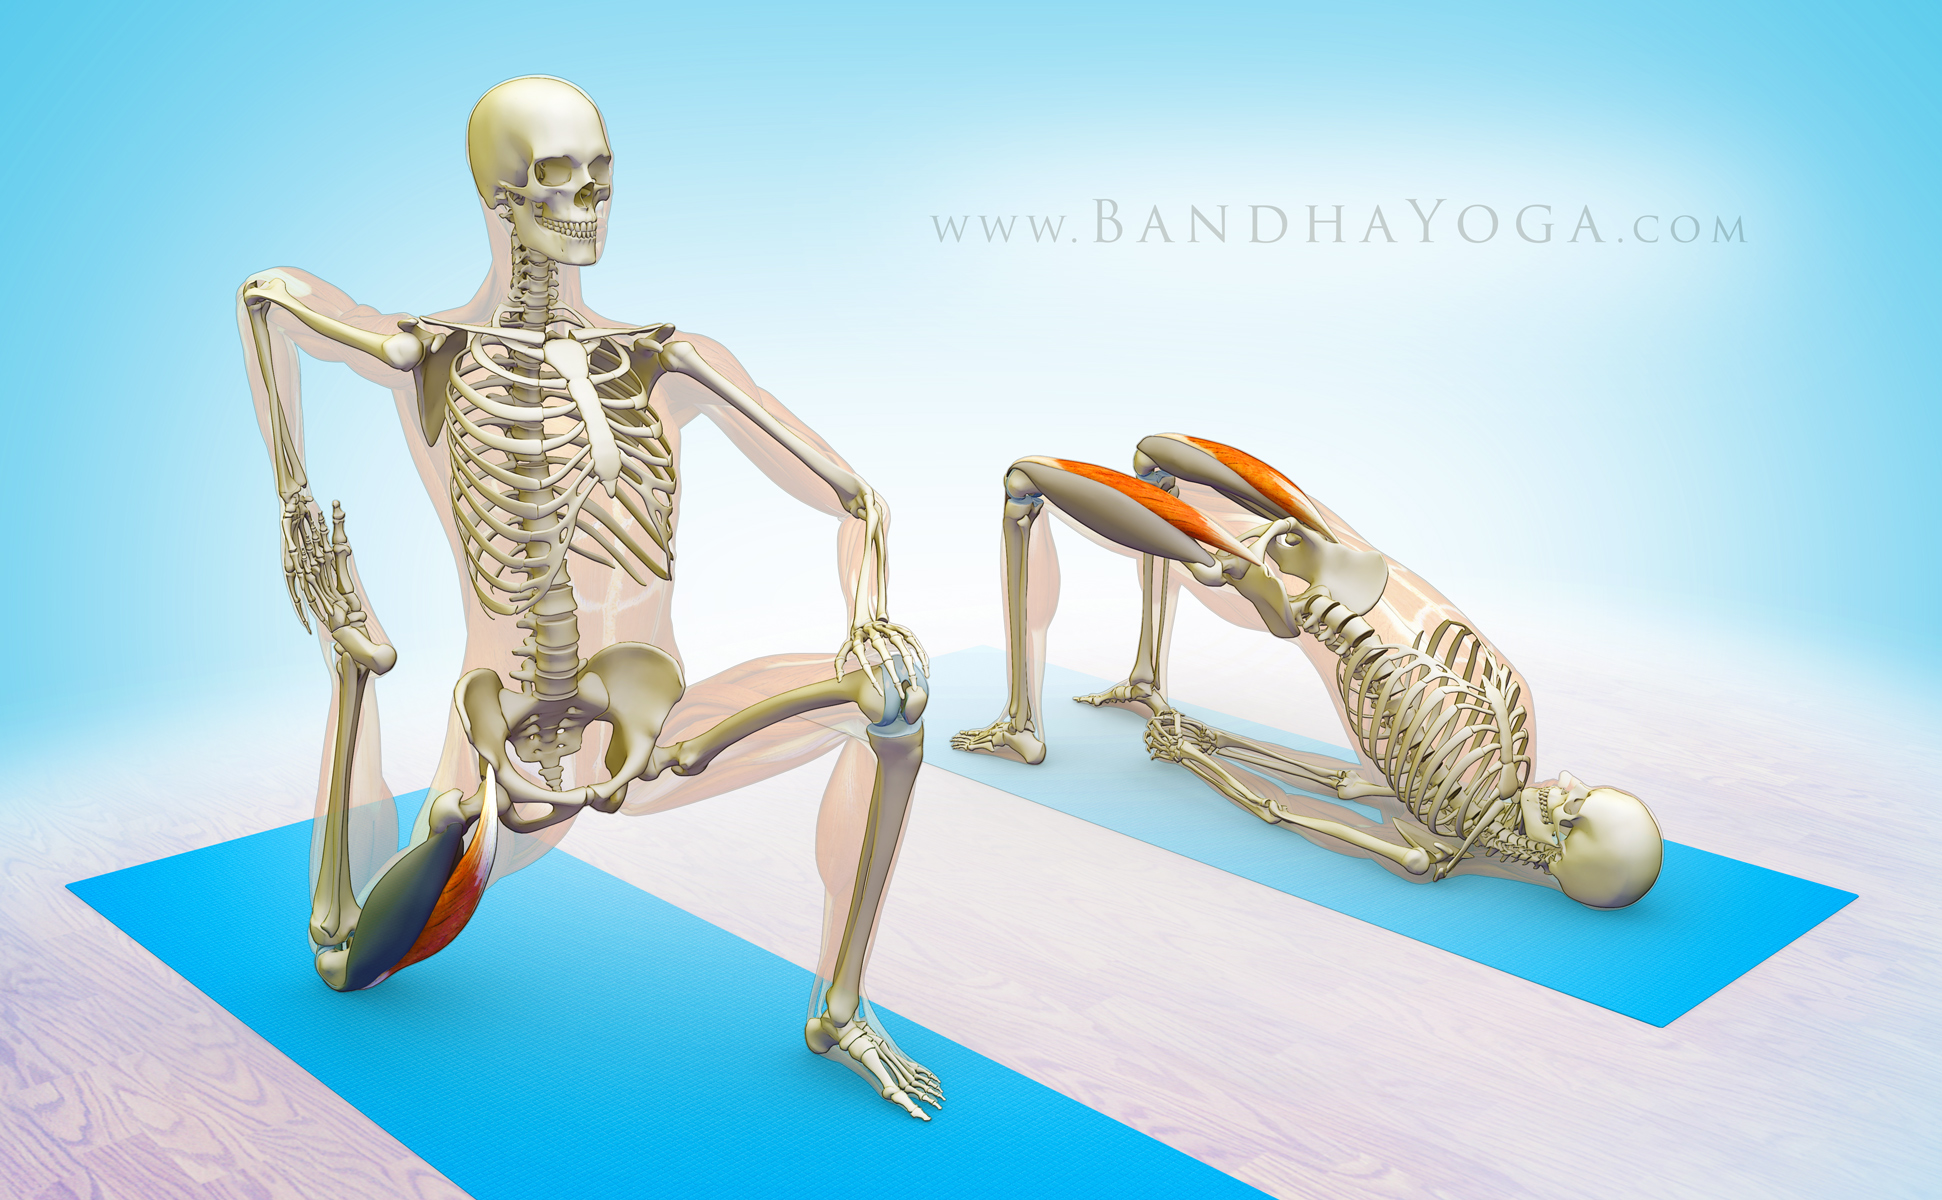
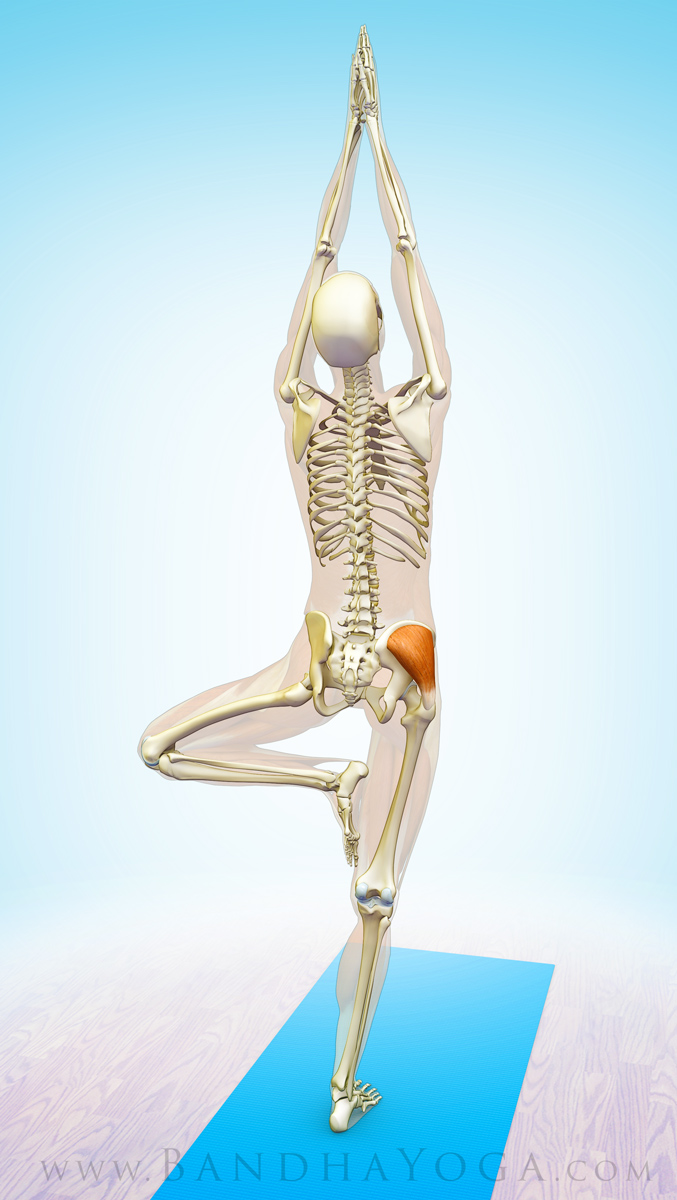
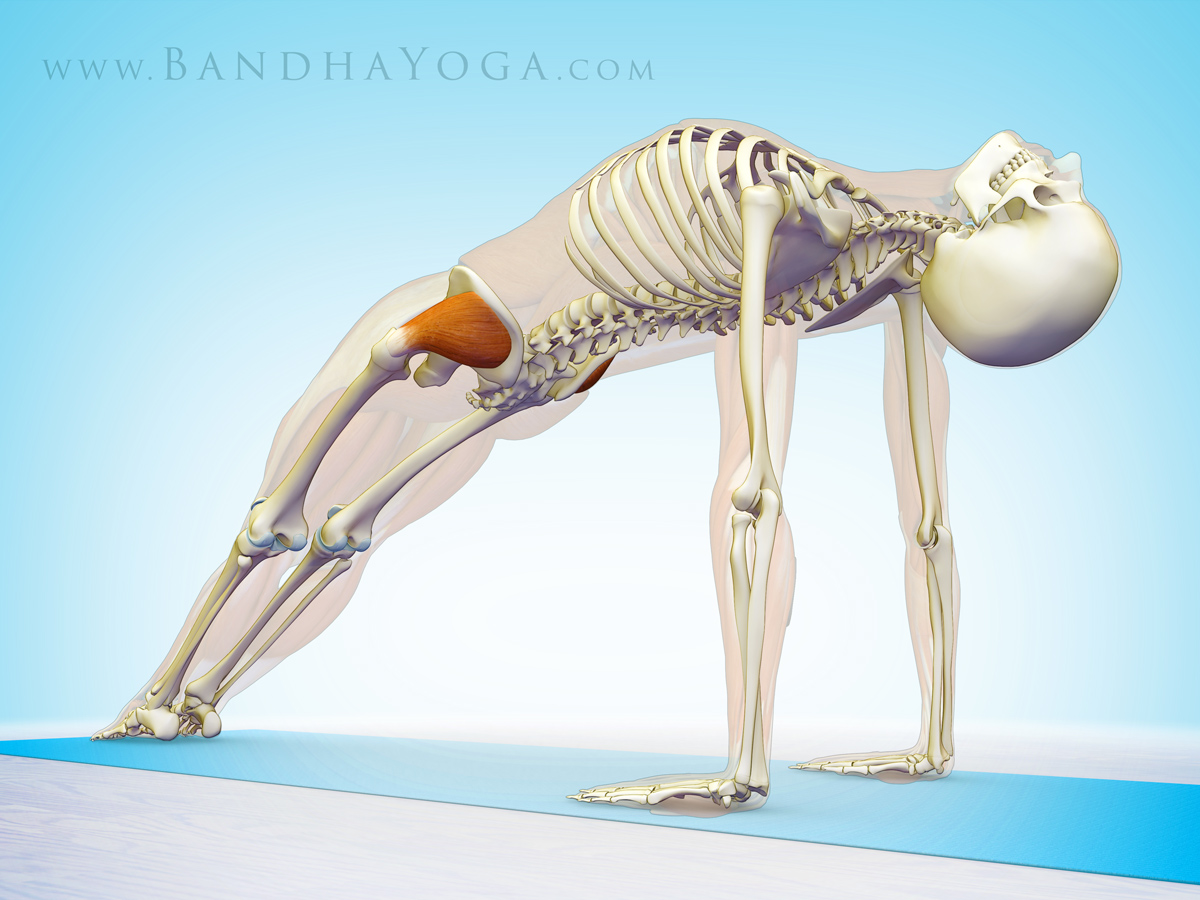
As an additional refinement, I engage the adductor Magnus by gently attempting to drag or “scrub” the back foot inward towards the midline (adducting it). Because the foot is constrained by the mat, the force of this action is transmitted to the origin of the muscle, as shown here. I have found that this cue works especially well in Warrior I for refining the position of the pelvis.

adductor magnus in warrior I
Engaging the back-leg adductor Magnus in Warrior I.
Click image for larger view.

The overall effect of these actions is to produce a series of forces that stabilize the asana from the foundation to the core. I get a feel for these cues first by using them in a shallower variation of the pose and build the muscular engagement gradually. This helps with stability and awareness.

Tuesday 23 January 2018

Sitting Up Straight and Expanding the Chest Forward in Sukhasana...

Sitting Up Straight and Expanding the Chest Forward in Sukhasana

Slumping the back and collapsing the chest is a common occurrence in Sukhasana, especially in those who are new to yoga. Factors that can contribute to this posture include fatigue, defeated mental state, and tight muscle groups. Many yoga poses are designed to counteract these factors, Sukhasana being one of them. Sitting up in Easy Cross-Legged Pose aids to bring the spinal column into alignment, so that the vertebral bodies and their discs support the torso; expanding the chest forward enhances breathing. With practice this can lead to a comfortable, easy position that is reflected on the central nervous system—an example of the mind/body connection in yoga.

seated poseseated pose

Here’s the Cue . . .


Place the hands with the palms facing down on the knees in Chin Mudra. Then, while holding onto the knees, attempt to draw the hands back towards the torso. This engages the latissimus dorsi. The hands are constrained, so the force of contracting the latissimus is transmitted to its origin along the midline of the back. The result is what is known in kinesiology as a “closed chain” movement, whereby the origin of the muscle moves (instead of the insertion). Activating the lats in this manner lifts the spine and expands the chest forward. If you tend to hyperextend the lumbar, then engage the abdominals to counteract this. Note the effect.


Slumping tilts the pelvis backwards into retroversion, so that one is sitting on the back part of the ischial tuberosities (the sitting bones). A portion of the latissimus dorsi originates from the back of the iliac crest, so that activating this muscle also tilts the pelvis forward, bringing the sitting bones more upright.

latissimus dorsi - tadasana
Lats in Tadasana

This technique is portable to other poses. In Tadasana, for example, simply fix the palms against the sides of the hips and attempt to drag them backwards. Note how the chest expands forward and the back straightens. See this concept in action for Sukhasana in the video above.

Here’s the Anatomy and Biomechanics. . .

The latissimus dorsi originates from the spinous processes of thoracic vertebrae 6—12, lumbar vertebrae 1—5 (via the thoracolumbar fascia), ribs 9—12, the supraspinous ligament, and the posterior third of the ilium. It inserts onto the intertubercular groove on the humerus and the deep fascia of the arm. The latissimus dorsi extends, adducts, and internally rotates the shoulder (open chain movement). It extends the spine and lifts and tilts the pelvis forward (closed chain movement) and is also an accessory muscle of respiration.

via: bandhayoga.

Wednesday 17 January 2018

Your Glutes in Backbends.

In this post we take a look at the glute max in backbends and how to avoid splaying out your knees in poses like Urdhva danurasana (Wheel). I give you some cues for sequencing muscle engagement and also address a misconception about contracting your adductor muscles.

For decades now we’ve heard the instruction in yoga, “soften your glutes in backbends” with no valid explanation why. Your hips are extending in backbends, and your gluteus maximus is the prime mover for that action. Why wouldn’t you want to contract the very muscle that creates that movement?

Let's look closer. When you deliberately soften your glutes, then the hip extension comes from the hamstrings, because your hamstrings work as synergists to the gluteus maximus for this action. So, why not just use your hamstrings to extend the hips and avoid getting scolded for using the prime movers (glutes)? Well, if you do that enough, you potentially set up a muscle imbalance that can lead to “synergistic dominance” wherein the hamstrings become the prime mover of this action. In the hip joint, this can result in abnormal kinematics and, ultimately, pain. I’ll go over some other problems with doing backbends without the glutes in Part II of this series.

One side effect of using your gluteus maximus is that it is also a powerful external rotator of the hip. Thus, when you engage your glute max in a backbend, your hips will rotate outward and your knees tend to splay apart.

Do we care if the knees splay out? Well, it depends on your objective in the pose. Recent literature shows that if the femurs are parallel, you fire your entire gluteus maximus, whereas when they are splayed apart, you fire mainly the upper portion (Selkowitz, 2016).

The “solution” that is usually proposed for this is to have folks try to squeeze a block between their knees to “fire those adductors!” In India, this instruction was often accompanied by much shouting at the frustrated person attempting it. There is a reason, however, why this cue works so poorly, despite the yelling. That is because when your hips are extended (in a backbend), the orientation of the adductor muscle fibers makes them become external rotators of the hip and synergize the gluteus maximus in splaying your knees apart. So it’s a bit like hitting the brakes and gas at the same time. Frustrating. Figure 1 illustrates this.

Figure 1: Note the orientation of the fibers of the adductor group and how contracting these muscles leads to splaying out of the knees in backbends.
The real counterbalance for the gluteus maximus causing the knees to splay apart is to contract the muscles that internally rotate the hips, namely, the TFL and front part of the gluteus medius.

This cue works well, but it must be implemented in a sequence to function optimally. You have to engage the hip internal rotators before going up into the backbend. It's difficult to engage them once you are up in the pose because when the hips are extending, the TFL and front part of the gluteus medius are at a biomechanical disadvantage for initiating contraction. Thus, you want to first train the cue to engage these muscles with the hips flexed, where it is easy to contract them. Then bring in the glute max to do the backbend. I’ve taught this sequence all over the world and had great feedback. Done properly, the muscles form a “sheath” that lifts the pelvis in a balanced and stable fashion. (Figure 2)

Figure 2: Note how the muscles at the front of the hips internally rotate the thighs to balance external rotation from the gluteus maximus.

Here’s the sequence.

Step 1) 

Lie on your back and bend your knees so that your feet are flat on the ground as shown. Place your hands on the front part of the pelvis to feel your internal rotators contract. Now, on exhalation, press the feet down and attempt to scrub them apart while allowing you knees to roll inward. Don’t actually move your feet. You should be able to feel your TFL contract. Release on the inhalation and repeat for about 10 times to train the action. Press your feet down and then attempt to scrub them away from the midline. The feet should remain fixed on your mat, as your knees roll inward and you should feel your muscles contract if you've got it.

Figure 3: Press your feet down and attempt to drag them apart as you allow your knees to roll inward. Place your hands on the front of your hips to feel the TFL and front of the gluteus medius contract with this action.

Step 2)

Follow the instruction from step 1, maintain the cue of pushing away from the midline with your feet and then dial in contraction of the gluteus maximus to lift the pelvis. You will be pushing down and away from the midline to engage your internal rotators and then engaging your glute max to extend the hips. Go up on the exhalation and down on inhalation. Try this about 10 times (2-3 sets). I recommend working with this set of cues for a few days before integrating them into a full back bend. Once you get it, then try the block thing (if you want). You’ll find it works better this way. 

(NB: if you experience knee pain in this pose, try pressing down with the heels more--this often helps.)

Figure 4: This illustrates the sheath of muscle surrounding the pelvis and lifting it into the bridge.


I hope you enjoy this post. Use muscle engagement as a barometer to help identify imbalances between the two sides of the body. Then carefully work to balance things. This is one of the benefits of practicing Hatha Yoga using knowledge of anatomy and biomechanics.

Good to see you all again. Check back for Part II in the sequence when I will go over the role of the deep external rotators and discuss synergistic dominance of the hamstrings in more detail.


via Ray Long, 

Tuesday 16 January 2018

The Rectus Femoris Muscle in Yoga.

Here’s the anatomy…

The rectus femoris is one of the four heads of the quadriceps muscle. It runs from the anterior inferior iliac spine to the quadriceps tendon, which attaches to the patella or kneecap. The patella then attaches to the tibial tubercle via the patellar tendon. The rectus femoris thus crosses both the hip and the knee, making it a bi-articular muscle. Note that the other three heads of the quadriceps muscle only cross the knee joint and are mono-articular (figure 1).

Figure 1: The rectus femoris muscle with its origin and insertion.

The rectus femoris combines with the rest of the quadriceps to extend the knee joint. It also acts as a synergist of hip flexion and has increased activity with abduction and external rotation of the hip joint. Figure 2 illustrates this in Supta padangustasana (performed with the leg abducted). Click here to learn more about the relationship between the quadriceps and the pelvis in our blog post, “Preventative Strategies for Lower Back Strains in Yoga.”

Figure 2: The rectus femoris contracting to flex the hip and extend the knee in Supta padangustasana.

Stretching the rectus femoris is best accomplished in poses that combine hip extension and knee flexion. Poses like Virasana (with the hips flexing) are good for stretching the other heads of the quadriceps, however, a reclining variation is necessary to lengthen the rectus femoris. Figure 3 illustrates two poses that stretch this muscle.

Figure 3: Stretching the rectus femoris by extending the hip and flexing the knee.

Finally, figure 4 illustrates the “antagonist/synergist” relationship between the rectus femoris and the gluteus maximus in poses like Warrior I. The gluteus maximus is a hip extensor and, thus, an antagonist of the rectus femoris for this action. If the foot is fixed on the mat, contracting the gluteus maximus tilts the pelvis as shown (closed chain action). Tilting the pelvis back and down creates a pull on the rectus femoris, which is transmitted to the knee joint, leading to more efficient knee extension. In this manner, the gluteus maximus is an indirect synergist of knee extension.

Figure 4: The antagonist/synergist relationship of the gluteus maximus to the rectus femoris. 


via: the daily bandha yoga.

Monday 15 January 2018

The Gluteus Medius Muscle in Yoga.

Here’s the anatomy…

The gluteus medius originates on the outer surface of the ilium bone and runs to the greater trochanter of the femur. This muscle acts to stabilize the pelvis when standing on one leg and during walking. The gluteus medius is also a primary abductor of the hip. Its anterior fibers act to synergize flexing and internally rotating the flexed hip; its more posterior fibers synergize extending and externally rotating the extended hip. The gluteus medius is innervated by the superior gluteal nerve, which is formed from nerve roots L4, L5, and S1. Figure 1 illustrates this muscle. 

Figure 1: The gluteus medius muscle with its innervation from the superior gluteal nerve. The gluteus maximus, with the inferior gluteal nerve is shown as a see-through.

Tree pose and other one-legged standing pose help to strengthen the gluteus medius, which is essential for stabilizing the pelvis of the standing leg (figure 2). Click here to read more about the function of the gluteus medius in one-legged asanas in our blog post, “Anatomic Sequencing in Yoga”. Click here to read about the connections of the gluteus medius during gait.

Figure 2: The gluteus medius stabilizing the pelvis in Tree Pose.

Figure 3 illustrates the gluteus medius contracting to help lift the leg in Ardha chandrasana (Half Moon Pose).

Figure 3: The gluteus medius stabilizing the lifted leg in Half Moon Pose.

Engaging the gluteus medius in Downward Dog pose can be used to synergize hip flexion. This muscle also helps to internally rotate the hips, thereby bringing the kneecaps to face forward. The cue for engaging the gluteus medius in Downward Dog Pose is to press the feet into the mat and then attempt to drag them apart. The feet remain constrained on the mat and do not move. However, the abductor muscles, including the gluteus medius, minimus, and TFL, engage to refine flexion and rotation of the hips. 

Figure 4 illustrates how to work with the gluteus medius and minimus to refine Downward Dog Pose.

Figure 4: Engaging the gluteus medius and minims in Downward Dog Pose.

Figure 5 illustrates the gluteus medius synergizing hip extension in Purvottanasana.

Figure 5: Engaging the gluteus medius to synergize hip extension in Purvottanasana.

Finally, figure 6 illustrates stretching the gluteus medius in Garudasana.

Figure 6: Stretching the gluteus medius in Garudasana.

via: the daily bandha yoga.

Tuesday 9 January 2018

Posture Guide...

Good Posture Infographic

Stomach Vacuum...

#healthy #pregnant

Stomach crunches used to be the biggest trend for those who wanted to have a flat tummy. Now, there’s something new that revolutionary changed the fitness world in getting the effects in this issue: stomach vacuuming.Stomach crunches used to be the biggest trend for those who wanted to have a flat tummy. Now, there’s something new that revolutionary changed the fitness world in getting the effects in this issue: stomach vacuuming.
This exercise not only strengthens the deepest muscle in your abdomen (the transverse abdominal) but also activates it.
The performing of this exercise is very simple, by only contracting the muscles. With the proper performance, you’ll get a slimmer waistline and some other benefits, such reduced lower back pain, and improved posture.
In the clinical context, the stomach vacuum exercise is known the abdominal drawing in the maneuver. Stomach vacuum is actually a pillar of both Pilates and yoga and it is focused on breathing.
How to Do the Stomach Vacuum
For the beginners is recommended to start with the most basic move known as the supine stomach vacuum. Here are the steps how to do the stomach vacuum exercise:
1) Start on lying, sitting or standing position or on your fours.
2) Your knees should be bent with your feet flat on the ground.
3) Intensely exhale as much as you can.
4) Pulling your belly button in, like you’re trying to reach your spine with it.
5) Stay in this position for at least 15 seconds.
6) Take small breaths if you need to.
7) Repeat the same for three to five times.