rasa is the "elixir", the "alchemy", the "taste" or essence of any impression; the aesthetic experience in transcendence; the emotional fulfillment of the soul; the nectar of life:))
Pages
▼
Tuesday, 23 October 2018
Thursday, 11 October 2018
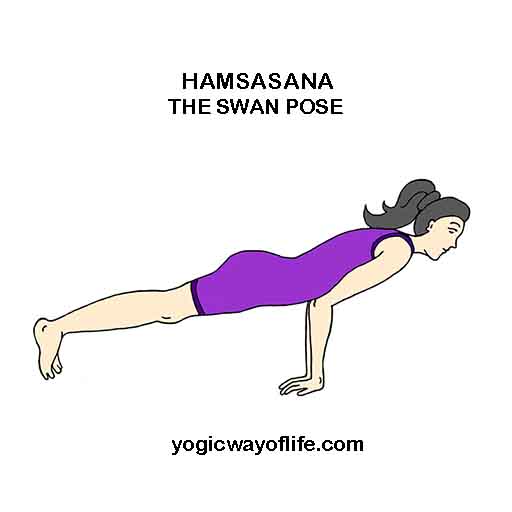
Hamsasana – The Swan Pose.
Hamsasana or “Swan Pose” is a yoga asana which resembles a swan when performed. Benefits of Hamsasana range from improved digestion to strengthening of the arms and abdominal muscles. In Sanskrit, ‘Hamsa’ means the swan and hence the name Hamsasana.
How to do Hamsasana (The Swan Pose)
- Hamsasana should be performed on an empty stomach. Make sure there is a gap of 4 to 5 hours after a heavy meal.
- Assume the kneeling position with the legs slightly apart.
- Keep both the hands between the knees on the ground. The hands should point back towards the legs.
- Rest your elbows on your abdomen. Let your abdominal muscles assume the weight of the upper body. The elbows should be kept together.
- Take the legs backward in a full stretch, one at a time.
- Make the body straight like a plank and use the toes to balance the weight of your legs. Keep the legs together.
- The body should be straight and make sure that your knees are not bent.
- In the final position, the entire weight of the body is supported by the toes and the palms on the ground.
- Head and neck should be kept straight to be in line with the body.
- In the beginning, you may try this position for 10 – 30 seconds. Once you are comfortable, you may increase it as per your capacity.
- Keep your awareness on the abdomen and breathe normally.
Benefits of Hamsasana (The Swan Pose)
- In Hamsasana, the weight of the upper body rests on the abdomen. This strengthens the abdominal muscles and helps to reduce the belly.
- It gives strength to the arms.
- The pressure on the belly massages all the organs in the abdomen.
- It improves digestion and clears constipation.
Hamsasana is very similar to Mayurasana or the Peacock pose. In fact, Hamsasana can be used as a preparatory pose for learning Mayurasana. Try to master Hamsasana first. Once you are able to maintain the position for at least 1 minute, then you can attempt Mayurasana. Take your own time. Make sure you are not straining the arms too much. Discontinue if there is any pain in the arms and shoulders. This asana puts a lot of weight on the arms and toes. Those with recent problems like fractures, sprains and ligament tears in arms or legs should not attempt this asana. Also, those who are obese should be extra careful as the entire weight will rest on the belly, arms, and toes. Hamsasana will certainly help to reduce the belly, but it has to be taken up slowly. Start with a few seconds and then increase the duration to a minute or more, according to your comfort and ability.
Once you have mastered Hamsasana, Mayurasana won’t be difficult. The only difference is that in Mayurasana, one has to lift both the legs above the ground. The body and the legs are made parallel to the ground and the full body weight rests on the arms and abdomen alone. This is difficult in the beginning. Start with few seconds and later increase it according to your capacity. The benefits of Mayurasana are similar to that of Hamsasana.
Tuesday, 9 October 2018
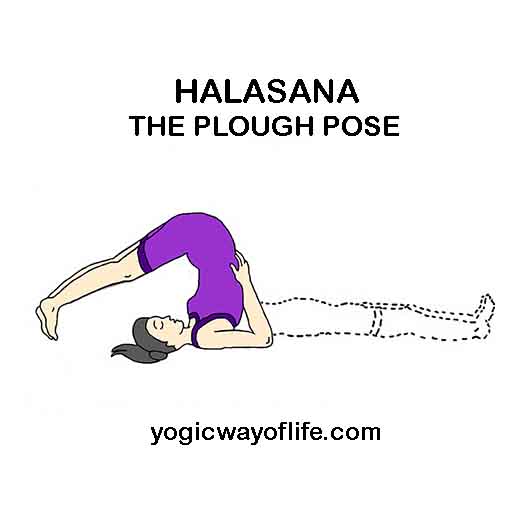
Halasana – The Plough Pose.
Halasana or plough pose can be practiced after one master the poorva halasana or the preliminary plough pose. Halasana can remove fat from the waist and improve the health of the abdominal organs especially the kidneys, pancreas and the intestines. It can also improve the functioning of the thyroid. In Sanskrit ‘Hal’ means a ‘plough’ and ‘Asana’ means ‘pose’. In Halasana, the body resembles the plough in the final pose.
Halasana should be done with care and should be avoided by those suffering from sciatica, slipped disk, spondylitis, high blood pressure.

How to do Halasana (The Plough Pose)?
- Start in the supine position, lying on your back.
- Relax fully and breathe normally. Keep the legs together and the hands should be kept close to the body.
- Hold your breath and slowly raise the legs to a vertical position. Use only the muscles of the waist and stomach to do this. Do not use the arms to lift the legs.
- Move the legs further back as much as possible. At this stage, one can use the hands to support the lower back and to further push the waist and trunk, until the legs touch the floor.
- Move the legs as further from the head as possible. At this stage, one achieves a chin lock. Pressure is put on the thyroid glands.
- Maintain this position for few seconds to few minutes depending on your level of comfort.
- Come back to the normal supine position. Relax all the muscles and breathe normally.
- After this asana, one can do any backward bending asana (like ushtrasana, supta vajrasana, chakrasana, etc.) as a counter pose.
Benefits of Halasana
- It helps to reduce fat around the waist.
- It stretches the abdominal organs especially the intestines, the kidneys, and the pancreas and improves the health of those organs. This is good for diabetic patients.
- The chin lock puts pressure on the thyroid glands and helps to balance metabolic rate.
- Halasana can improve digestion, relieve piles and constipation.
Saturday, 6 October 2018
Wednesday, 3 October 2018
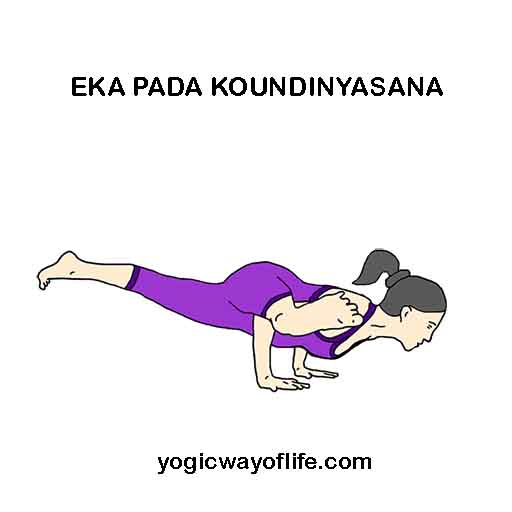
Eka Pada Koundinyasana.
Eka Pada Koundinyasana or the one-legged pose of Sage Koundinya strengthens the arms, neck, and wrists. In Sanskrit, Eka means one, Pada means leg and Asana is a pose. This pose is an arm balance posture named after Sage Koundinya.
How to do Eka Pada Koundinyasana?
- Start with the standing position or Tadasana. Then come into a squat with thighs pressing together, sitting on the toes of the feet.
- Twist towards the left and place both the hands on the floor. The right hand will be touching the left leg above the knees.
- Lean forward towards the left and try to lift yourself off the floor by using both the hands. This is same as the twisted Bakasana. From this position, we can move on to the Eka Pada Koundinyasana.
- Take the left leg backward and at the same time move the right leg forward and let it rest on top of the right-hand elbow. (Now, doing this may be difficult. Hence, one can try first keeping the left leg straight pointing out and the right leg backward, straight in line with the body. From here, in a single step flip the left leg back and the right leg forward.)
- This is the final pose. The right leg is pointing outwards towards the right and the left leg is straight in line with the body. The left hand and elbow are free, just balancing the weight of the body.
- Remain in the final position for as long as you are comfortable. In the final pose, one can hold the breath or can take very slow shallow breaths.
- To release the pose, lower the left leg and let it touch the floor. At the same time, the right leg can be bent and lowered to touch the floor. From here come back to the squat position.
- This can be repeated on the other side also.
Benefits of Eka Pada Koundinyasana
- Eka Pada Koundinyasana strengthens the arms, wrists, and shoulders.
- It improves the sense of balance.
- The spinal twist strengthens the spine.
- The abdominal organs are massaged and toned.
- It rejuvenates the digestive organs.
Eka Pada Koundinyasana is an advanced posture and should not be attempted by beginners. One requires the good strength of the arms and wrists and a great sense of balance to achieve it. Those suffering from any injury of arms, wrist or shoulders should avoid this asana.

